

A1200.net has done exceedingly well via crowd funding and more especially for the Amiga community these last few years as not only did they smash a Kickstarter success for their new Amiga 1200 case Kickstarter, but more recently they have also pushed towards a keycap Kickstarter success as well. Thankfully after many concerns about the Amiga cases not appearing, due a number of delays and the bad feelings regarding Kickstarters, we are happy to say that not only are they being shipped to backers, but we have one in our hands for an exclusive review!
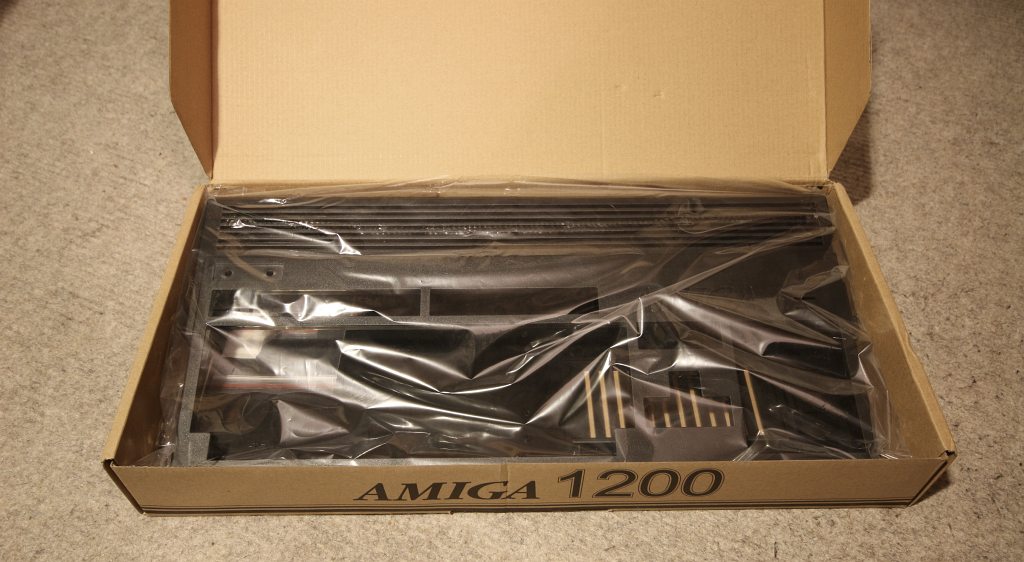
Now usually when we do reviews we have the product already out on show, but this time here is the Amiga 1200 case still in its wrapping, and still untouched from grubby hands. The reason behind this is to make a point that according to the creator, other backers should have more protection for their Amiga's as ours was rushed out prior to Christmas day. No that I had any concerns as the courier used wasn't Hermes and any issues that did arise in delivery would be dealt with.

Upon opening the box you will be greeted by either this black beauty or many of the other colours chosen by you during the Kickstarter crowd funding campaign. I must say I really did like the gritty textured feel of this case, something Amiga owners will know all to well with their original Amiga cases and a concern that will now be put aside.


At the rear of the new Amiga 1200 case you can just make out each of the ports which are labelled as they were when the Amiga 1200 first came out. The only difference being supplied with the case are a number of accessories that make it much easier for those of you that need a DVI,HDMI or VGA plastic place adaptor. Although this is blanked off at first and can be easily removed.


Moving to the front of the case and just as it did all those years ago next to the H.DISK,F.DISK and Power LED's, the name AMIGA which stands out in big bold lettering, which if it was missing just wouldn't be the same. Thankfully it's every bit as good as the original case and surrounded by a lovely textured feel.
But putting the high praise aside you can just about notice the slight squared discoloration in the top left hand corner. This is where the Lotharek HxC LCD Display would go, with pre cut lines available from the inside. The problem is for people who are purists at least, or those with OCD like myself, in the correct lighting the square stands out. It almost looks as if it wasn't painted properly, which is a little niggling.

Underneath the new Amiga 1200 case here you can see a seriously cool ( hence the word ) new expansion trapdoor, which is newly designed inclusive of big vents for better airflow. I really liked this new addition which is great for owners of rather hot accelerators, but do be aware the trapdoor at least in my case was very difficult to unclip. I was very worried about breaking the tab as it needed some force to remove, unlike my old one.

Opening the case up and this nearly brought a tear to my eye. Now I'm not sure if you've noticed the Signatures during the Kickstarter which was engraved into the cases, but one of those names is Dave Needle. Sadly earlier this year the Co-Founder of the Amiga Computer, Co-Inventor of the Atari Lynx and vice-president of 3DO (Dave Needle) had passed away. He was and still is a legend, so seeing his signature made the case even more special, even if it wasn't as intended this way.

Next up it's time to put them both together! At this distance you'd find it very hard to tell the difference between the two designs (Which is a good thing!), bar the colour and the lack of the badge on the black case, which will come from mine. What you can tell however is the slightly yellowed keys on my white Amiga that has happened to many other Amiga's across the globe. This case has hardly ever seen the sun apart from a few days here and there, and yet still even in box it went yellow. Not any longer though ;)

On the topic of the black, there is another issue I found with my new case. On about 80% of it, the spray is perfect and of very high quality, but on some parts namely the top back and towards the top grill there are patches of less spray. It's kind of like someone used a paint brush and used more on one part but less on another. This isn't noticeable at a distance but it is up close, again just a niggle.


Now we move on to the good stuff, fitting the hardware! To tell you the truth I've never been more scared in my life of changing hardware. I've done PC's before but this was my retro baby! Anyway it fitted in the new case without a hitch and looked very nice indeed, even if the yellow keys from my old case stood out a mile away.

But here is another issue, believe me the case isn't perfect even if it looks lush. The floppy button to make it all black just wasn't the right one. You can see just how different it looks in the above photo, even more so that my one has a slot which slides over the metal casing. So for now I'm going to just have to stick with the white button.

Once again I had more problems, even though all the hardware inside was snug and the keyboard and floppy was in the right place, I just could not put the top case back on nor could I get my PCMCIA card to go in. I tried multiple ways to fit the case back but it would just not fit. It turned out it was the hardware caddy for my CF drive and then the LED cables getting in the way.

Although they fit perfectly in my old case, (I did try this again to make sure) I had to have the hard drive caddy out and the LED cables wired somewhere else. Once I knew what was causing it, it was easy to sort the case problem out, but as of yet I haven't found away of getting a PCMCIA card to fit properly. Believe me I have tried everything, but it does now take some effort to put the thing in right which wasn't a problem before.

Finally it was all done and complete and wow does it look bloody amazing, I mean seriously I've been wanting a black case for a very long time and even my girlfriend remarked how good it looked. It was just a shame I ran into issues with fitment, everything would go straight in my old case, but in this new one it was as if either the case was slightly warped, the holes were not big enough (PCMCIA) or something else was getting in the way from being a perfect match. I could put the detailing bar the odd imperfection paintwork aside but something wasn't right with my new case, most likely because it was one of the very early editions - the first one?
New video uploaded!
But anyway putting all that aside it's now ready for showing, I am still very happy with it. By heck I wouldn't go back to my old case anymore. I seriously like this one as the new Amiga 1200 case by A1200.net looks amazeballs even if it's missing those wicked black keycaps ;)
UPDATE : Regarding the imperfections and floppy button, I have an update from A1200.net
"Just about the "discolorations" you might see.. these aren't discolorations.. it's material behavior (plastic). On the white cases (and like on original) this can't be seen.. Only sometimes on colored ones..
Regarding the floppy button it's normal. All backers will receive 3 more floppy buttons later on.. There is 4 versions.."
No comments:
Post a Comment
*ENGLISH ONLY*
Constructive criticism allowed, but abusive comments will be removed. Play nice and enjoy IndieRetroNews! :)